Futures trading on Binance allows you to speculate on the future price of cryptocurrencies by using leverage (borrowing funds) to amplify your potential profits or losses. Here’s a step-by-step guide to trading futures on Binance:

1. Create a Binance Account
- Sign up: If you don’t already have a Binance account, head to Binance and create one by signing up with your email and password.
- KYC Verification: For futures trading, Binance requires Know Your Customer (KYC) verification, which involves uploading a government-issued ID and potentially completing face verification.
2. Transfer Funds to Your Futures Account
- Deposit Funds: Deposit funds (crypto or fiat) into your Spot Wallet.
- Transfer Funds to Futures Wallet:
- Go to the “Wallet” section.
- Select Futures Wallet and click on Transfer.
- Transfer funds from your Spot Wallet to your Futures Wallet. Binance futures mainly use USDT or BUSD as collateral.
3. Access Binance Futures
- Click on the Derivatives tab on the Binance homepage, and choose USDⓈ-M Futures or COIN-M Futures.
- USDⓈ-M Futures: Uses stablecoins (USDT or BUSD) as collateral.
- COIN-M Futures: Uses cryptocurrency like BTC, ETH as collateral.
4. Understand the Interface
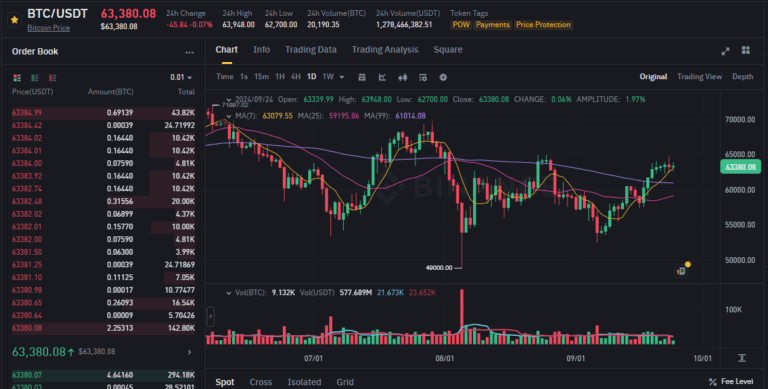
The Binance Futures trading interface may seem complex at first. Here’s a breakdown of key areas:
- Price chart: The chart of the selected cryptocurrency with candlestick patterns and technical indicators.
- Order book: Lists the buy and sell orders placed by other traders.
- Position information: Shows your current open positions, unrealized P&L (profit and loss), and margin details.
- Leverage: Shows the current leverage applied to your trades.
- Order types: Market, limit, stop-limit, stop-market orders, etc.
5. Choose Your Leverage
- Leverage: Binance Futures allows leverage ranging from 1x to 125x.
- Higher leverage can significantly increase profits, but it also increases the risk of liquidation (losing all your margin).
- Setting leverage: Click on the leverage amount displayed above the trading panel. You can choose the desired leverage depending on your risk tolerance.
- For example, with 10x leverage, a $1000 position would require only $100 as margin.
6. Analyze the Market
- Technical Analysis (TA): Study the price charts and technical indicators like RSI, MACD, and Bollinger Bands to predict price movements.
- News and Events: Futures markets are highly sensitive to news, especially related to regulations, crypto project upgrades, or economic events.
7. Place a Futures Trade
- Choose the Trading Pair: At the top left of the futures interface, select the crypto pair you want to trade (e.g., BTC/USDT).
- Choose Order Type: You can place different types of orders:
- Market Order: Buys or sells the contract at the current market price.
- Limit Order: Sets a specific price at which you want to buy or sell.
- Stop-Limit: Executes a buy or sell order at a specified price once a trigger price is hit.
- Take-Profit / Stop-Loss: Automatically close your position at a target profit level or stop out at a loss.
- Enter Order Details:
- Set the quantity of contracts to buy or sell.
- Select Buy/Long if you expect the price to rise or Sell/Short if you expect the price to fall.
- Place the Order: Once your details are set, click Buy/Long or Sell/Short to place the order.
8. Monitor Your Position
- Open Positions: Once your order is filled, you will see it under the “Positions” tab, where you can monitor:
- Entry price: The price at which the trade was executed.
- Unrealized P&L: Your current profit or loss based on the asset’s current price.
- Liquidation Price: The price at which your position will be automatically closed if the market moves against you.
- Adjusting Leverage: You can adjust the leverage of your open position in the “Positions” tab if you need to increase or reduce exposure.
9. Manage Risk (Stop-Loss and Take-Profit)
- Set Stop-Loss: This automatically closes your position if the price moves against you to prevent bigger losses.
- Example: If you open a long position on BTC at $25,000, you may want to set a stop-loss at $24,000 to limit your losses to $1,000.
- Set Take-Profit: Automatically closes your position once a target profit level is reached.
- Example: You can set a take-profit at $28,000 if you expect BTC to rise to that level.
- These risk management tools are critical when trading with high leverage.
10. Close Your Position
- To manually close your position:
- Go to the Positions tab, and click Close Position.
- You can close at the market price or set a specific price to exit the trade.
- Alternatively, the trade will automatically close if your take-profit or stop-loss conditions are met.
11. Monitor Fees and Funding Rate
- Trading Fees: Futures trading fees on Binance are lower than spot trading fees but still worth noting. Fees depend on whether you’re a maker (placing limit orders) or a taker (market orders).
- Funding Rate: In futures, the funding rate is a fee that long or short traders pay to each other based on market conditions. If the funding rate is positive, longs pay shorts, and if negative, shorts pay longs. This ensures the futures price stays close to the spot price.
12. Withdraw Profits
- After closing your positions, transfer your funds from your Futures Wallet to your Spot Wallet.
- You can then withdraw your crypto or fiat funds to your personal wallet or bank account.
Tips for Success:
- Start with Lower Leverage: As a beginner, use lower leverage (e.g., 2x or 3x) to minimize the risk of liquidation.
- Keep Learning: Futures trading requires a solid understanding of market movements and risk management. Use Binance’s demo account or small trades to practice before going bigger.
- Avoid Emotional Trading: Stay disciplined and stick to your trading strategy to avoid emotional decisions like revenge trading after losses.